1. Monitor Your Blog's Page Load Speed
First,
you need to test your blog's page load speed and then monitor it on an
ongoing basis so you're aware of problems as they arise. Google offers
two useful tools to do this through its Google Web Developers website.
Use Google PageSpeed Insights to get an overall PageSpeed Score and tips to speed page load up on your blog. Use Google Speed Tracer to get a more detailed report filled with data about the performance of your blog. The Pingdom Website Speed Test tool is another great option to identify processes on your blog that are running slowly.
2. Use a Fast Server
Your blog page load speed is only as fast as your web server. If you use a blogging platform like WordPress.org and host your blog through a third party web host,
contact your web host's support team to better understand your server
speed and to ensure that your blog has enough bandwith to handle peak
traffic times.
3. Get a Caching Plugin
If you use WordPress.org as your blogging platform, then you can use a free caching plugin like W3 Total Cache or WP Super Cache
to reduce your blog's page load speed. Every time a page loads on your
blog, your web host has to serve every element on that page to the
visitor's web browser. Using a caching plugin, your web host doesn't
have to retrieve some elements from the server every time a page is
displayed. Instead, the host can store elements in a cache and call them
from there, which speeds up page loads.
4. Optimize Images
If
you're not resizing your images before you upload them to your blog or
you're not using the best file formats for online images, then you're
slowing down the page load speed for your blog. Always resize images to
the actual size you need in your published blog post or page before you
upload them to your blog. Large images are a resource drain and will not
only take up valuable space in your hosting account but will also slow
down your blog page load speed. Furthermore, make sure images that you
use on your blog are saved in JPEG or PNG format. You can use a free image editing tool to resize and reformat images. You can also use Smush.it to reduce file sizes. If you use WordPress.org as your blogging application, you can use the WP Smush.it WordPress plugin.
5. Reduce Plugins
If you use WordPress.org as your blogging application, how many plugins
are you using on your blog? Each plugin can slow down your blog's page
load speed, particularly if some of those plugins are not well coded.
Delete all unnecessary plugins and try to hard code as many features and
functions as possible within your theme files.
6. Reduce Redirects
If
a page on your blog redirects to another page intentionally or
unintentionally (for example, a broken link redirects to an error page
on your blog), then your blog's page load speed will be negatively
affected. If your host can't find the information in the first place it
looks, it needs to look again elsewhere. That takes time. Only use
redirects when it's absolutely necessary and fix broken links on a
consistent basis. You can use a tool like Broken Link Checker to identify broken links on your blog, so you can easily fix them.
7. Delete Unnecessary Javascript, CSS, and HTML Code
Extra
Javascript, CSS, and HTML code can slow down page load speed. Delete
unnecessary code whenever possible. For example, is there duplicate code
on your blog, meaning the same function is performed by two different
tools but could be reduced to just one? If you come across duplications
like this, eliminate them and your page speed should improve.
8. Make Sure Your Blogging Application, Theme, and Plugins are Up-to-Date
Don't get lazy about updating your blogging application, themes,
and plugins. Not only can old code in old versions of blogging
applications, themes, and plugins open your blog up to security threats,
but it can also have a direct impact on your blog's page load speed.
Always upgrade!
9. Reduce HTTP Requests on Each Page
Fewer
elements on a page mean faster page load speeds because there are fewer
HTTP requests required. For example, every image, piece of text, ad,
video, and so on that appears on a web page has to be served to visitors
through HTTP requests. Delete elements that add more clutter than value
to your pages, and your page load speed will improve. You can also
consider combining elements. For example, a series of images could be
combined and uploaded as a single, optimized image.
10. Omit Problematic Third-Party Add-ons and Elements
Messy
ad code, widgets, embeds, and other add-ons provided by third parties
that appear on your blog could cause problems with page load speed.
Sometimes the code in third party elements is fine, but the code doesn't
play nicely with your blog theme or other plugins or elements used on
your blog. If you notice a particular third-party element consistently
loads slowly on your blog, consider removing it to boost your page load
speed.
a) Server
Choosing suitable hosting for your venture is the
first step in starting a website. Hosting with a professional
configuration can be of big help. Here you can find some good tips about choosing hosting.
1. Leverage browser caching
"Expires headers tell the browser whether a resource on a website needs
to be requested from the source or if it can be fetched from the
browser’s cache. When you set an expires header for a resource, such as
all jpeg images, the browser will store those resources in its cache. The next time the visitor comes back to the page it will load faster, as the browser will already have those images available," says CJ Patrick in a nice article about how to use expire headers to set caching: Expires Headers for SEO
Unfortunately, it seems that SEOmoz doesn't use expiration for stylesheets and images.
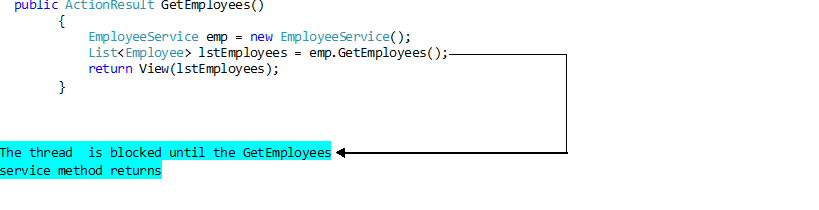
2. Enable Keep-Alive
"A Keep-Alive signal is often sent at predefined intervals and plays an
important role on the Internet. After a signal is sent, if no reply is
received, the link is assumed to be down and future data will be routed
via another path until the link is up again," says wikipedia.
In fact, HTTP Keep-Alive allows TCP connections to stay alive and it helps reducing the latency for subsequent requests.
So contact your hosting provider and tell them to think twice about
this! Most hosting companies disable this feature, (including SEOmoz's
host) because it's an optional feature (whenever it transfers less than
60 bytes per request).
3. Enable gzip compression
 * Image by betterexplained.com
"Gzip is the most popular and effective compression method currently available and generally reduces the response size by about 70%. Approximately 90% of today's Internet traffic travels through browsers that claim to support gzip," says Yahoo.
Gzipping reduces the size of the HTTP response and helps to reduce
response time. It's an easy way to reduce page weight. You can enable it
by adding the following code to your .htaccess file:
* Image by betterexplained.com
"Gzip is the most popular and effective compression method currently available and generally reduces the response size by about 70%. Approximately 90% of today's Internet traffic travels through browsers that claim to support gzip," says Yahoo.
Gzipping reduces the size of the HTTP response and helps to reduce
response time. It's an easy way to reduce page weight. You can enable it
by adding the following code to your .htaccess file:
# compress text, html, javascript, css, xml:
AddOutputFilterByType DEFLATE text/plain
AddOutputFilterByType DEFLATE text/html
AddOutputFilterByType DEFLATE text/xml
AddOutputFilterByType DEFLATE text/css
AddOutputFilterByType DEFLATE application/xml
AddOutputFilterByType DEFLATE application/xhtml+xml
AddOutputFilterByType DEFLATE application/rss+xml
AddOutputFilterByType DEFLATE application/javascript
AddOutputFilterByType DEFLATE application/x-javascript
# Or, compress certain file types by extension:
<files *.html>
SetOutputFilter DEFLATE
</files>
Or, use the following PHP code at the top of your HTML/PHP file:
<?php if (substr_count($_SERVER['HTTP_ACCEPT_ENCODING'], 'gzip')) ob_start("ob_gzhandler"); else ob_start(); ?>
Or, simply use plugins for your CMS (like the WP HTTP Compression plugin for WordPress).
SEOmoz uses gzip. However, some external javascripts (AdRoll, Simpli
and CloudFront) could reduce transfer size more than 60% by using gzip.
4. Make landing page redirects cacheable
Mobile pages redirect users to a different URL, (for example www.seomoz.org to m.seomoz.org) so making a cacheable redirect can speed up page load time for the next time visitors try to load site. Use a 302 redirect with a cache lifetime of one day. It should include a Vary: User-Agent as well as a Cache-Control: private. This way, only those visitors from mobile devices will redirect.
Since SEOmoz doesn't support any specific mobile version, it can't have
this problem (someone should take care of the bad behavior of SEOmoz's
website on mobile devices)!
5. Use a CDN
 A content delivery network (CDN) is a collection of web servers distributed across multiple locations to deliver content more efficiently to users.
The server selected for delivering content to a specific user is
typically based on a measure of network proximity. For example, the
server with the fewest network hops or the server with the quickest
response time is chosen. As you can see in the above image, it loads
from different servers, based on the visitor's region. You can compare
CDN hosting with standard web hosting here.
It seems that SEOmoz uses Amazon CloudFront for this functionality and I've tried MAXCDN, It's awesome, too. You can manage your caches and lots of other useful tools in one WordPress using W3 Total Cache.
A content delivery network (CDN) is a collection of web servers distributed across multiple locations to deliver content more efficiently to users.
The server selected for delivering content to a specific user is
typically based on a measure of network proximity. For example, the
server with the fewest network hops or the server with the quickest
response time is chosen. As you can see in the above image, it loads
from different servers, based on the visitor's region. You can compare
CDN hosting with standard web hosting here.
It seems that SEOmoz uses Amazon CloudFront for this functionality and I've tried MAXCDN, It's awesome, too. You can manage your caches and lots of other useful tools in one WordPress using W3 Total Cache.
b) Content elements
Since you don't have total access to your server, content elements are
the most important things that you can manipulate. Let's start with the
most obvious weakness of SEOmoz:
1. Minimize redirects
Sometimes to indicate the new location of a URL, track clicks, connect
different parts of a site together or reserve multiple domains, you need
to redirect the browser from one URL to another. Redirects trigger an
extra HTTP request and add latency. Only keep redirects which are
technically necessary and you can't find any other solution for it.
These are Google's recommendations:
-
Never reference URLs in your pages that are known to redirect to other
URLs. Your application needs to have a way of updating URL references
whenever resources change their location.
-
Never require more than one redirect to get to a given resource. For
instance, if C is the target page, and there are two different start
points, A and B, both A and B should redirect directly to C; A should
never redirect intermediately to B.
-
Minimize the number of extra domains that issue redirects but don't
actually serve content. Sometimes there is a temptation to redirect from
multiple domains in order to reserve name space and catch incorrect
user input (misspelled/mistyped URLs). However, if you train users into
thinking they can reach your site from multiple URLs, you can wind up in
a costly cycle of buying up new domains just to stop cybersquatters
from taking over every variant of your name.
This image shows what happens when your browser tries to load SEOmoz.org:
 As you can see, the greatest latency is the result of some external
redirect chains. SEOmoz is using about 20 redirect chains that slow down
the load time about 3000 milliseconds.
As you can see, the greatest latency is the result of some external
redirect chains. SEOmoz is using about 20 redirect chains that slow down
the load time about 3000 milliseconds.
2. Remove query strings from static resources
You can't cache a link with a "?" in its URL even if a
Cache-control: public header is present. The question mark acts the
same as Ctrl+F5. Use query strings for dynamic resources only. SEOmoz is
using two dynamic URLs with "?" because of using KISSmetrics, but 2-3
queries are reasonable ;)
3. Specify a character set
Specify a character set in HTTP headers to speed up browser rendering.
This is done by adding a simple piece of code into your header:
<meta http-equiv="Content-Type" content="text/html; charset=utf-8">
Note: Some CMSs use functions for character set (like WordPress with <?php bloginfo('charset'); ?>
). I suggest that if you are sure about your character set, write it
instead of using PHP functions. It helps to minimize request size, so
try to use HTML instead of PHP everywhere that is possible.
4. Minify your codes
 Removing HTML comments, CDATA sections, whitespaces and empty elements will decrease your page size, reduce network latency and speed up load time.
You can use simple online tools like Will Peavy minifier, and if you are using WordPress, Autoptimize can optimize and compress your codes and it supports CDN as well. By the way, SEOmoz could save 620B by compressing its HTML.
Removing HTML comments, CDATA sections, whitespaces and empty elements will decrease your page size, reduce network latency and speed up load time.
You can use simple online tools like Will Peavy minifier, and if you are using WordPress, Autoptimize can optimize and compress your codes and it supports CDN as well. By the way, SEOmoz could save 620B by compressing its HTML.
5. Avoid bad requests
 Broken links result in 404/410 errors. These cause wasteful requests.
Fix your broken URLs (pay special attention to images). Use online broken link checker or use WordPress link checker for free. You can also read about Xenu Link Sleuth and Screaming Frog tools at SEOmoz that can be really helpful.
Broken links result in 404/410 errors. These cause wasteful requests.
Fix your broken URLs (pay special attention to images). Use online broken link checker or use WordPress link checker for free. You can also read about Xenu Link Sleuth and Screaming Frog tools at SEOmoz that can be really helpful.
6.Serve resources from a consistent URL
It's best to share Google's recommendation:
"For resources that are shared across multiple pages, make sure that each reference to the same resource uses an identical URL.
If a resource is shared by multiple pages/sites that link to each
other, but are hosted on different domains or hostnames, it's better to
serve the file from a single hostname than to re-serve it from the
hostname of each parent document. In this case, the caching benefits may
outweigh the DNS lookup overhead. For example, if both mysite.example.com and yoursite.example.com use the same JS file, and mysite.example.com links to yoursite.example.com (which will require a DNS lookup anyway), it makes sense to just serve the JS file from mysite.example.com. In this way, the file is likely to already be in the browser cache when the user goes to yoursite.example.com."
7. Reduce DNS lookups
DNS lookups take a meaningful amount of time to look up the IP address
for a hostname. The browser cannot do anything until the lookup is
complete. Reducing the number of unique hostnames may increase response times. Just look at how a DNS lookup can take about 3 seconds of load time in SEOmoz. You can measure yours, by using Pingdom Tools.
I do want to mention that when I re-tested the homepage of SEOmoz.org
from a server in Dallas, it showed better results than it did before I
started writing this article.
Note: Sprite your images. This means put images that are loading every
page of your site together to reduce your DNS lookups. SEOmoz combined
lots of its images into one, like this sprite image. You can find more information on SpriteMe
c) CSS, JS and Images
1. Specify image dimensions
Your browser begins to render a page before images are loaded.
Specifying image dimensions helps it to wrap around non-replaceable
elements. If no dimensions are specified, your browser will reflow once
the images are downloaded. In order to do that in <img> elements, use height and width tags specifications.
Note:
Don't use dimensions to scale images on the fly -- the user will still
be downloading the original file size, even if the image doesn't take up
as much space on the screen.
2. Optimize images
Images can contain extra comments and use useless colors. Keeping image
sizes to a minimum is a big help for users on slow connections. Try to
save in JPEG format. You can use a CTRL+SHIFT+ALT+S shortcut to save an optimized image in Adobe Photoshop, use Yahoo! Smush.it, or if you are using WordPress, you can install the WP Smush.it plugin.
SEOmoz could save more than 50KB by optimizing images on the main page, particularly those in the slider.
3. Put CSS at the top and JS at the bottom
Putting stylelsheets in the document head
of the page prohibits progressive rendering, so browsers will block
rendering to avoid having to redraw elements of the page. In most of
cases, users will face a white page until the page is loaded completely.
This also helps you to make a standard web page according to W3 standards. And, put your javascript code at the bottom of the page for the same reason.
There are of other ways to speed up a web page, but I have tried to
write about the most important ones which even professional bloggers
(like SEOmoz) can sometimes overlook. Of course, site speed is not the
main goal but even an ideal website with a bad load time will find it
hard to achieve success. Run the fastest website you can in order to
reach your goals faster.
Tip #1 – Size images before uploading them
If you use a content management system (CMS) like WordPress or Joomla,
you’ve probably noticed that you can upload images at full size and
then adjust their display size within your website’s backend. However,
doing so forces web browsers to execute multiple commands – pulling up
the initial images and then re-sizing them on-the-fly – which can slow
down your site.
To prevent this from occurring, use an image editing
program to adjust images to the correct size before adding them to your
site.
Tip #2 – Eliminate unnecessary plugins
The huge number of plugins
and scripts that are freely available today makes it tempting for
webmasters to add more than they truly need. Keep in mind, though, that
every plugin you add requires resources to run – and more resources
mean a slower site.
Before adding any new plugins to your site, ask yourself
if the functionality you gain is worth the trade-off in site speed, or
whether the plugin’s content could be coded into your site’s theme
instead.
Tip #3 – Make sure your site’s scripts are up-to-date
Depending on the CMS or ecommerce platform your site uses,
you may need to check back regularly to determine whether new releases
of your site’s scripts are available. If they are, upgrade your site as
soon as possible (making sure that you have a current backup file in
place first). Site script developers are always working on improving
their code for future releases, particularly when it comes to site
speed. Updating your scripts to the latest versions could go a long way
towards eliminating coded roadblocks that prevent your site from
loading quickly.
Tip #4 – Make use of CDNs
Content delivery networks – or, CDNs – are vast networks
of servers that are housed around the world. When you store website
content like images using these services, rather than storing them
locally on your hosting account, you enable the CDN to serve up your
information from the server that’s closest to your website visitor. The
result? Faster load times that will make your customers and the search
engines happy.
Tip #5 – Enable browser caching
Browser caching is a technology that allows a website
visitor’s browser to store copies of your site’s individual pages so
that, if the visitor returns in the future, the content can be called up
from within the cache – rather than reloading the entire page. This
saves on the number of resources used to display your pages, resulting
in faster overall load times.
The easiest way to enable browser caching is with a plugin, like the WordPress W3 Total Cache tool. Alternatively, talk to your web developer about ways to integrate browser caching into your server-side scripting.
Tip #6 – Turn on Gzip compression
Gzip compression is a technology that minimizes the size
of browser-based HTTP responses – sometimes by as much as 70%. If that
doesn’t make sense, don’t worry. Long story short, using Gzip
compression can speed up your site’s load times significantly.
There are three ways to turn on Gzip compression on your site. You can:
1. Add the following code to your site’s .htaccess file:
# compress text, html, javascript, css, xml:
AddOutputFilterByType DEFLATE text/plain
AddOutputFilterByType DEFLATE text/html
AddOutputFilterByType DEFLATE text/xml
AddOutputFilterByType DEFLATE text/css
AddOutputFilterByType DEFLATE application/xml
AddOutputFilterByType DEFLATE application/xhtml+xml
AddOutputFilterByType DEFLATE application/rss+xml
AddOutputFilterByType DEFLATE application/javascript
AddOutputFilterByType DEFLATE application/x-javascript
# Or, compress certain file types by extension:
<files *.html>
SetOutputFilter DEFLATE
</files>
2. Add the following code to the top of your HTML or PHP page:
<?php if (substr_count($_SERVER['HTTP_ACCEPT_ENCODING'], ‘gzip’)) ob_start(“ob_gzhandler”); else ob_start(); ?>
3. Install a Gzip compression plugin like the WP HTTP Compression tool for WordPress (just keep in mind what we said earlier about installing too many unnecessary plugins!).
Tip #7 – Keep CSS files at the top of your page and Javascript code at the bottom
Finally, keep your site’s code neat and tidy by adding CSS
files to the top of your page’s code and Javascript snippets to the
bottom when working with raw HTML pages. Adding your CSS files to the
top of the page prohibits progressive rendering, saving resources that
web browsers would otherwise use to load and redraw elements of your
pages. Adding Javascript to the bottom prevents your pages from waiting
on full code execution before loading – leading to a faster browsing
experience for your visitors.
Although these are only a few of the different techniques
that can be used to speed up your site, they’re some of the easiest to
implement. Start with this list if you notice your site slowing down,
but don’t hesitate to contact a developer for more technical solutions
if these steps alone don’t solve your site speed problems.
Optimize Images
One of the easiest ways to decrease the size of your web pages and
increase load times is to properly resize and optimize your images.
Using images that are larger than they will be displayed in your web
page means that there is a lot of unnecessary data being transferred.
Once you have resized your images there are a number really handy tools like Smush.it and TinyPNG
to reduce the size of the files further. These tools work by removing
unnecessary data from the images and optimizing the use of colors.
Minify CSS & JavaScript Code
Minifying your CSS and JavaScript code can help to reduce the size of
these assets by removing unneeded whitespace and optimizing your code.
Minifying your code does make it incredibly difficult for humans to
read, so I would only minify when you are ready to launch a site.
CSS Compressor and JavaScript Compressor are two handy web apps that can minify your code for you.
Avoid using @import
The @import CSS rule allows you to load other CSS files into your stylesheet. Whilst this can sometimes be useful, files loaded through @import cannot be downloaded at the same time as the main stylesheet which increases the overall load time of the page.
Instead of using @import consider copying the CSS from the external file into your main stylesheet or use multiple <link> tags.
Reduce The Number of HTTP Requests
Another great way of speeding up your web pages is to simply reduce
the number of files that need to be loaded. There a few ways that you
can do this.
Combine Files
Combining multiple stylesheets into one file is a really useful way
of eliminating extra HTTP requests. This strategy can also be adopted
for your JavaScript files. A single larger CSS or JavaScript file will
often load quicker because more time can be spent downloading the data
rather than establishing multiple connections to a server.
Use CSS Sprites
Using CSS sprites can be a great way of reducing the number of HTTP
requests your page needs to load. A CSS sprite is a collection of images
within a single image file. They are particularly useful for instances
where you have a lot of small icons. You set the background image of an
HTML element to the sprite using CSS and then use some clever CSS code
to position the background image so that only the image within the
sprite that you wish to use is visible.
For more information on using CSS sprites check out this article on CSS-Tricks.
Leverage Browser Caching
Your website probably contains files that don’t change very often.
Things like images, CSS files and JavaScript assets. You can help to
speed up your page load times by instructing the browse to cache a copy
of these files on the hard drive so that next time the user visits your
web page these resources will not need to be downloaded again.
To leverage browser caching you need to update your web server configuration to serve up resources with Expires headers. This is what tells the browser how long it should keep the cached files for.
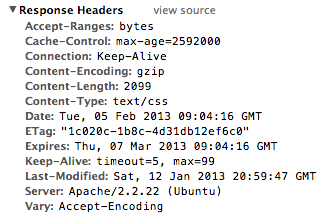
Inspecting Response Headers in Chrome Dev Tools
The easiest way to update your server configuration for Apache servers is to use a .htaccess
file. The code below shows an example configuration that would set all
image, CSS and JavaScript resources to be cached for 1 month.
<IfModule mod_expires.c>

# Enable Expirations
ExpiresActive On

# Default Expiration Time
ExpiresDefault "access plus 1 month"

# Expiration for Images
ExpiresByType image/gif "access plus 1 month"
ExpiresByType image/png "access plus 1 month"
ExpiresByType image/jpg "access plus 1 month"
ExpiresByType image/jpeg "access plus 1 month"

# Expiration for CSS
ExpiresByType text/css "access plus 1 month”

# Expiration for JavaScript
ExpiresByType application/javascript "access plus 1 month"

</IfModule>
10 Ways to Speed Up Your WordPress Sites
 1. Hosting. According to the WordPress.org
site, "There are hundreds of thousands of web hosts out there, the vast
majority of which meet the WordPress minimum requirements, and choosing
one from the crowd can be a chore."
To make things easier for you, WordPress recommends three sites above all others, which are: Bluehost, DreamHost and Laughing Squid. I'd like to add a fourth site: Hostgator, which is the one I use and which has been recommended to me by many bloggers.
2. Type of Hosting. On many sites, you can get
hosting for low rates but that’s almost certainly shared hosting. While
the price is low, the tradeoff is speed. If you want your site to
perform faster, consider a service like Turnkey Internet. Among other things, they offer bulletproof reliability and a 100% Network Up-time Guarantee.
3. Test the speed of your site. Here are two services you can use:
Once you know the speed of your site, you can use it as a benchmark.
After you make the various changes listed here, test your site again to
see what happens to your site speed.
4. Browser Caching. Another way to speed up a WordPress site is through browser caching. One such plugin that will help you is W3 Total Cache. It’s also recommended by several Hosting companies, including HostGator.
5. Reduce Image Size. This one issue can slow
your blog down to a crawl, especially if you have a large number of
images on a page. Generally, I recommend JPEG for photographic images
and GIF or PNG-8 for text. Another option is the regular form of PNG,
but you must take care when using it because it can bloat images by 5 to
10 times as compared to JPEG. Here, compression is really important,
but there are tradeoffs. Too much compression will cause “artifacting,”
where portions of the image begin to clump together.
1. Hosting. According to the WordPress.org
site, "There are hundreds of thousands of web hosts out there, the vast
majority of which meet the WordPress minimum requirements, and choosing
one from the crowd can be a chore."
To make things easier for you, WordPress recommends three sites above all others, which are: Bluehost, DreamHost and Laughing Squid. I'd like to add a fourth site: Hostgator, which is the one I use and which has been recommended to me by many bloggers.
2. Type of Hosting. On many sites, you can get
hosting for low rates but that’s almost certainly shared hosting. While
the price is low, the tradeoff is speed. If you want your site to
perform faster, consider a service like Turnkey Internet. Among other things, they offer bulletproof reliability and a 100% Network Up-time Guarantee.
3. Test the speed of your site. Here are two services you can use:
Once you know the speed of your site, you can use it as a benchmark.
After you make the various changes listed here, test your site again to
see what happens to your site speed.
4. Browser Caching. Another way to speed up a WordPress site is through browser caching. One such plugin that will help you is W3 Total Cache. It’s also recommended by several Hosting companies, including HostGator.
5. Reduce Image Size. This one issue can slow
your blog down to a crawl, especially if you have a large number of
images on a page. Generally, I recommend JPEG for photographic images
and GIF or PNG-8 for text. Another option is the regular form of PNG,
but you must take care when using it because it can bloat images by 5 to
10 times as compared to JPEG. Here, compression is really important,
but there are tradeoffs. Too much compression will cause “artifacting,”
where portions of the image begin to clump together.
 The fastest way to find out what will happen is to use a program that
offers several previews of your image at different compression levels.
Move around the image to see how the compression affects it. You’ll
quickly find out which setting works best for you.
If you have Photoshop or a similar program, resizing images is no
problem. If not, here are some links to inexpensive or free programs: Paintshop Pro, Gimp or Image Compressor.
6. Specify the Image Size: When loading images
into WordPress it’s important to set the width and height of an image.
If you don’t do that, the browser has to wait until the image is fully
loaded. Setting the width and height allows the browser to allocate a
box on the page for an image.
The fastest way to find out what will happen is to use a program that
offers several previews of your image at different compression levels.
Move around the image to see how the compression affects it. You’ll
quickly find out which setting works best for you.
If you have Photoshop or a similar program, resizing images is no
problem. If not, here are some links to inexpensive or free programs: Paintshop Pro, Gimp or Image Compressor.
6. Specify the Image Size: When loading images
into WordPress it’s important to set the width and height of an image.
If you don’t do that, the browser has to wait until the image is fully
loaded. Setting the width and height allows the browser to allocate a
box on the page for an image.
 7. Keep Your WordPress Installation Updated.
Keeping WordPress current is important for several reasons. Updates fix
bugs from previous versions and can also include performance
enhancements, too.
8. Reduce the Number of Plugins. One of the
great things about WordPress is the number of plugins it supports, but
if you have a large number installed that can create software conflicts
and even cause the blog to crash. The solution is simple. Only use
what’s absolutely necessary and delete the rest. Also, make sure you
keep your plugins up to date.
9. Choose a Simple and Clean Theme. WordPress
abounds with theme options, both free and paid. To ensure that you have a
theme that performs well, make sure that it’s not heavily dependent on
images. While images look great, they also slow down loading. Another
thing to look for is a theme with a CSS based design. Finally, use Pingdom or Webpage Test to see how well the themes perform.
10. Adjust Your Front Page. Many people leave WordPress with the
default setting for the front page, with the result that all your posts
load on one, endlessly scrolling page.
7. Keep Your WordPress Installation Updated.
Keeping WordPress current is important for several reasons. Updates fix
bugs from previous versions and can also include performance
enhancements, too.
8. Reduce the Number of Plugins. One of the
great things about WordPress is the number of plugins it supports, but
if you have a large number installed that can create software conflicts
and even cause the blog to crash. The solution is simple. Only use
what’s absolutely necessary and delete the rest. Also, make sure you
keep your plugins up to date.
9. Choose a Simple and Clean Theme. WordPress
abounds with theme options, both free and paid. To ensure that you have a
theme that performs well, make sure that it’s not heavily dependent on
images. While images look great, they also slow down loading. Another
thing to look for is a theme with a CSS based design. Finally, use Pingdom or Webpage Test to see how well the themes perform.
10. Adjust Your Front Page. Many people leave WordPress with the
default setting for the front page, with the result that all your posts
load on one, endlessly scrolling page.


